Chaining Builds In Openshift
New application
Creating a Node.js application in Openshift is simple:
 oc login -u user
 oc new-project hello

 # Assuming you are logged and you have a project you can start here.
 oc new-app --name node-app nodejs~https://github.com/cesarvr/hello-world-nodejs #new app using nodejs:latest (Node.js 8)
This command will create the backbone (BuildConfig, DeploymentConfig and Service) to orchestrate the different stages from source code to a running application.
The size problem
But this nice abstraction come with a cost, to explain what I mean, let's review size of our final image using du:
# We log into our container and run
cd /
du -sh
474M	.
We found our image weight to much (474MB) relative to the amount of code we are running just (8 Byte).
  require('http').createServer((req, res) => {
    res.end('Hello World')
  }).listen(8080)
This happens because the tools we used at build (gcc, g++, npm, yum cache, etc.) are still present in the image inflating its final size. If you are just getting started as a developer in Openshift it may not be a big of a deal; also for quick proof of concepts is totally fine but it may have a cost for later stages like production that you may take into consideration.
Slim is better
Some disadvantages of having a huge image are:
- Higher cost in CPU & Ram to deploy your images.
- If you have fixed resources bigger images slow deployments.
- They add more stress on the cluster network.
- Maintenance overhead. (You may end up maintaining dependencies your are not using)
If you need more reasons for more smaller containers:
 )
)
Chaining containers
The strategy to solve this problem is to have two images one with the tools to build the image and a second one with the essential libraries for runtime. Let's see how much we can improve those 474M.
Builder image
We can start by creating an image with the necessary tooling, we are going to call this image builder:
oc new-build nodejs~https://github.com/cesarvr/hello-world-nodejs \
--context-dir=. \
--name=builder
nodejsNew build using nodejs (Node.js 8) as our base image which include the tools we need to build our software.context-dirThis parameters tells where is the code.
This command will create two Openshift objects:
- BuilderConfig This object handle the image creation using s2i.
#builder configuration
oc get bc
NAME      TYPE       FROM      LATEST
builder   Source     Git         1
- ImageStream It's like the middleman between our image and everything else. After a successful build the resulting image is streamed here.
oc get is
NAME          DOCKER REPO                         TAGS      UPDATED
builder       172.30.1.1:5000/hello/builder       latest    6 hours ago
Great!, we have our image with the tools we need. Next step is to trigger a build to prepare our application.
If everything is fine we should have all our Node.js artifacts inside a new image for us to consume, the nodejs base image we are using store the artifacts and our code in /opt/app-root/src/.
Runtime image
Now we need to create the image that will take care of the runtime. Let's start by explaining this version of the oc new-build command:
oc new-build  --source-image=builder \
--source-image-path=[source-dir]:[destination-dir] \
--dockerfile='-' --name=runtime
source-imageWe want the nodejs image we created above.--source-image-pathWe want to copy some files from that image.dockerfileWe want to create a new image using those files. Note: writing'dockerfile='-'will allow us to feed the Dockerfile via standard input.
Now that we know how to do it, we should create a file called runtime.Dockerfile to store the definition of our runtime container.
FROM mhart/alpine-node:base-8
COPY * /run/
EXPOSE 8080
CMD ["node", "/run/app.js"]
This file define a container using mhart/alpine-node which is only 42 MB, next line copy the content from the builder image. The third and fourth line expose a port and run execute our script. This container image of course need more work to be production ready but is just fine for our purposes.
We execute the command:
cat runtime.Dockerfile | oc new-build --name=runtime \
--source-image=builder \
--source-image-path=/opt/app-root/src:. \
--dockerfile='-'
The content of builder/opt/app-root/src/ is copy by the oc new-build into a temporary folder, then our Dockerfile use this folder as it's context folder. When we apply COPY * /run/ we basically are copying the content of this folder into our new runtime container.
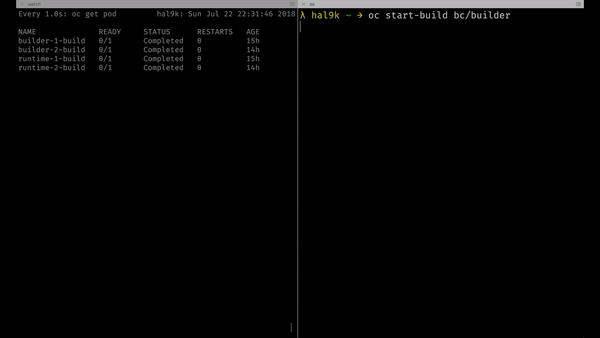
In the next animation you'll see how builder build configuration is now connected with runtime build. Every time builder push a new build of our software to the registry, it will be automatically packaged by runtime.
To trigger the builder build we just need to run:
oc start-build bc/builder
Deploying our image
Is time to test if our hard work pays off. Deploying our image is very easy we just need to locate the URL of our runtime image in the registry:
oc get is
#NAME          DOCKER REPO                         TAGS      UPDATED
#runtime       172.30.1.1:5000/hello/runtime       latest    15 hours ago
Having the address of our image, now we just simply call:
oc create dc hello-ms --image=172.30.1.1:5000/hello/runtime
Now that we create our deployment object, we now need to send some traffic to our application. Before start sending traffic we need to identify by looking up is label.
oc get dc hello-ms -o json | grep labels -A 3
# returns
"labels": {
            "deployment-config.name": "hello-ms"
          }
Now let create a service and send some traffic directed to this label:
oc create service loadbalancer  hello-ms --tcp=80:8080
# service "hello-ms" created

# edit the service object
oc edit svc hello-ms -o yaml
This will open the service object in yaml format in edit mode, we need to locate the selector and replace with the label of our deployment object.
From this:
selector:
  app: hello-ms
To this:
selector:
 deployment-config.name: hello-ms
We can do this the other way around, at the end is just a matter of taste. Next we need to expose our service:
oc expose svc hello-ms
# route "hello-ms" exposed

oc get route
# NAME       HOST/PORT                         PATH      SERVICES   PORT      TERMINATION   WILDCARD
# hello-ms   hello-ms-hello.127.0.0.1.nip.io             hello-ms   80-8080                 None
Now know the URL we can confidently make a curl to that address:
curl hello-ms-hello.127.0.0.1.nip.io
Hello World%
Take a look at the complete process here:

Other ideas that come to my mind about how to take advantage of this decoupling is that you can maybe tag some specific nodes to with labels that match your builder image this way you focus all the resources to bring value back to your customer, and you have some specific resources to handle the software related duties.