Decoupling Jenkins Stages On Multiple Containers
Part of my day-to-day work consist in helping teams transition from monolithic architectures to a build-and-own your service using Openshift. As a gentle introduction into that world, I wrote some guides to provide a starting point to this transition. Recently I distribute this minimalistic “Hello World” Jenkins Pipeline which looks like this:
pipeline {

  agent {
    label 'nodejs'
  }

  stages {
    stage("Creating Openshift Components") {
      steps {
        sh "node -v"
      }

      /* More steps */

    }
  }
}
This code will schedule and execute a Jenkins job and it will run the job inside a NodeJS-8-Jenkins-Slave container provided by Red Hat.
The output:
[Pipeline] stage
[Pipeline] { (Creating Openshift Components)
[Pipeline] sh
[test] Running shell script
+ node -v
v8.16.1
[Pipeline] }
[Pipeline] // stage
[Pipeline] }
This was very welcome but as soon as they started to implement this I started to receive some feedback. A team in particular was trying to build their Angular 8 (which required minimum Node 10) and the default image only supports NodeJS:8 while another group of guys were asking for ways to add configuration files into their builds.
So after all this good feedback it became clear that this approach lacks the flexibility to handle various those use cases and that it needed some improvements or a totally different approach.
Kubernetes Plugin For Jenkins
After reading the documentation for the Jenkins Kubernetes Plugin more carefully (sometimes that’s all it takes) I discover that they include Jenkins DSL API that allows you to define in code the properties of the pod running your job.
What Is A Pod Anyways
A pod can be thought as a container that runs one or more containers inside presenting them to the exterior as a single logical host (or a machine if you prefer). This is very handy when you want to hide the deployment complexity of a particular system inside a single deployable unit.
This entity enables us to think of containers as objects, for example, we can take one task like build your code and put it in a container and delegate the deployment to another image. Any change in this system is isolated to its own container (build or deploy).
Defining A Pod
Then defining our pod as code in Jenkins DSL looks like this:
podTemplate(cloud:'openshift',
  label: BUILD_TAG,
  containers[/* run rhel7 ... */] )
Where:
cloudThis should point to the Kubernetes configuration. I'm running this onopenshift, so it's the default choice.labelis a way to identify the pod, this allows the plugin to locate your pod in the cluster.containeris an array of container objects, you can define containers usingcontainerTemplatefunction.
Running Containers Inside
To define a container we use:
containerTemplate(name: ‘’, image: ‘’, /*...*/ )
Where:
nameThe container name.imageThe image to instantiate the container (for example:rhel7:latest).
For more documentation for the Kubernetes Plugin.
Hello World
After knowing all this overcoming the container version limitation is trivial, we just need to find an image in our container registry that has the tools to run our build. In the above case we just need a Node.JS:10 image.
To check for available images in the openshift namespace:
oc get is -n openshift | grep node
#nodejs docker-registry.default.svc:5000/openshift/nodejs 10,4,6 + 4
Good, we see that nodejs:10 is the supported, so let's use that as the image our pod:
def NODEJS_IMAGE = 'docker-registry.default.svc:5000/openshift/nodejs:10'
def NODEJS_CONTAINER_NAME = 'nodejs'

podTemplate(cloud:'openshift', label: BUILD_TAG,

  containers: [
      containerTemplate(name: NODEJS_CONTAINER_NAME, image: NODEJS_IMAGE,
       ttyEnabled: true,
       command: 'cat'),
  ] ) {

    node(BUILD_TAG) {

        container(NODEJS_CONTAINER_NAME) {
          // Running on NodeJS container...

          stage('Hello World') {
              echo "build: " + BUILD_TAG
              sh 'node -v'
          }
          /* More NodeJS related stages ... */

        }

    }
}
You can practice this by creating a new pipeline type of item in Jenkins.
The
command:catandttyEnabledis just a small hack to avoid a race condition between Jenkins and our manually defined container. Those options will keep the container alive until Jenkins execute the job.
The output:
[Pipeline] stage
[Pipeline] { (Hello World)
[Pipeline] echo
build: jenkins-ctest-test-5
[Pipeline] sh
[test] Running shell script
+ node -v
v10.13.0
[Pipeline] }
[Pipeline] // stage
[Pipeline] }
Nice, we not longer need to wait for Red Hat to update their NodeJS-Slave-Container and the teams can use any official image to build their Angular 8 application.
Customizable
Another thing we wanted to improve was the way we add configuration files (this time without visiting the Jenkins UI) to the build job, let's create add a configuration file via Config Map.
First let's create a Config Map:
echo "Hola Mundo" >> hello.txt
oc create configmap hello-es --from-file=hello.txt
Now let's add this configuration file to our build:
def NODEJS_IMAGE = 'docker-registry.default.svc:5000/openshift/nodejs:10'
def NODEJS_CONTAINER_NAME = 'nodejs'

podTemplate(cloud:'openshift', label: BUILD_TAG,

  /*
    We can attach the volumes here:
      configMapVolume(configMapName:'', mountPath:'')
      persistentVolumeClaim(claimName:'', mountPath:'')
  */

  volumes: [configMapVolume(configMapName: "hello-es", mountPath: "/my-config")],

  /*

  */

  containers: [
      containerTemplate(name: NODEJS_CONTAINER_NAME, image: NODEJS_IMAGE,
       ttyEnabled: true,
       command: 'cat')
  ] ) {

    node(BUILD_TAG) {

        container(NODEJS_CONTAINER_NAME) {
            stage('Hello World') {
                echo "build: " + BUILD_TAG
                sh 'node -v'
            }

            stage('Translating To Spanish'){
              echo "Hello World: "
              sh "cat /my-config/hello.txt"
            }
        }

    }
}
mountPath:refers in what folder inside the container you want to mount the Config Map, you need to specify a folder, if the folder is not there it will be created.
Composition
Now this is getting interesting, we can build the code but we can't create a container in Openshift yet because the Node-10 image doesn't have the tools for that. As we mentioned before instead of (god forbid) adding those tools via Dockerfile, we instead are going to use another container Jenkins-Slave-Base to handle that task.
How Do They Talk To Each Other
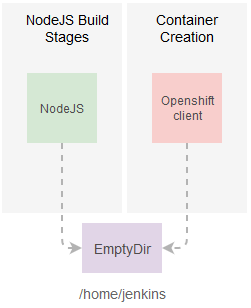
As mentioned before we can run one or more containers in a pod but one thing I forgot to mention is that the pod offers a shared context to those pods, meaning you can configure your containers in such a way that they share resources (like a folder) between them.
The Kubernetes Plugin in particular configures the containers so they share the same Jenkins workspace making it easy for one or more containers to collaborate in a single build.
In this example we can see an example of this:
def NODEJS_IMAGE = 'docker-registry.default.svc:5000/openshift/nodejs:10'
def NODEJS_CONTAINER_NAME = 'nodejs'

def OC_CLIENT_IMAGE = "registry.redhat.io/openshift3/jenkins-slave-base-rhel7:v3.11"
def JNLP_CONTAINER = 'jnlp'

podTemplate(cloud:'openshift', label: BUILD_TAG,

  volumes: [configMapVolume(configMapName: "hello-es", mountPath: "/my-config")],

  containers: [

      /*
        Container with Node 10
      */

      containerTemplate(name: NODEJS_CONTAINER_NAME, image: NODEJS_IMAGE,
       ttyEnabled: true,
       command: 'cat'),

       /*
         Container with the oc-client
       */
       containerTemplate(name: "jnlp", image: OC_CLIENT_IMAGE)

  ] ) {

    node(BUILD_TAG) {

        container(NODEJS_CONTAINER_NAME) {
            stage('Building Node 10') {
                sh "node -v"
                /*
                  Clone the repository and install dependencies,
                  changing the workspace folder.
                */
                git 'https://github.com/cesarvr/hello-world-nodejs.git'
                sh "npm install"

                // This should fail here [don't have oc-cli]
                sh "oc version || true"
            }
        }

        container(JNLP_CONTAINER) {
            stage('Building Node 10') {
                /*
                 We should see the files generated by the [npm install] above...
                */
                sh "ls -lart"

                // This should work here
                sh "oc version || true"
            }
        }

    }
}
The name of the second container
jnlphas a special meaning to Jenkins. It means that this container has a Jenkins Agent (this will reduce the amount of container running).
Let's take a look at the execution:
### Start: nodejs containner

#> git checkout -b master 9d5b5bad2efdbddd15f04d922ceef646036594e7
#Commit message: "fix"
# > git rev-list --no-walk 9d5b5bad2efdbddd15f04d922ceef646036594e7 # timeout=10
#[Pipeline] sh
#[test] Running shell script
+ npm install

[test] Running shell script
+ oc version
/home/jenkins/workspace/ctest/test@tmp/durable-995cdffc/script.sh: line 2: oc: command not found
+ true

### End: nodejs containner

### Start: jnlp containner

-rw-r--r--. 1 default 1051760000 229 Mar  2 15:58 package.json
-rw-r--r--. 1 default 1051760000  89 Mar  2 15:58 app.js
drwxr-sr-x. 8 default 1051760000 162 Mar  2 15:58 .git
-rw-r--r--. 1 default 1051760000  68 Mar  2 15:58 package-lock.json

Server https://172.30.0.1:443
openshift v3.11.43
kubernetes v1.11.0+d4cacc0

### End: jnlp containner
Both containers can see the same workspace folder but each container has its own tools (you can see how the NodeJS failed to locate the
oc-client).
Permissions
In order to deploy applications we should have a quick review to service account. We can think of service accounts as a user for pods or anything that wants to change the state of Openshift, this accounts are usually namespace scoped so a pod won't go wild messing up everything.
Any new pod (like the one running our build) gets an default service account which has minimum permissions to get itself up and running. But we actually want to change the state of Openshift (create an image and push it to the registry) and these permissions are not enough for that.
The good news is that Jenkins creates a service account jenkins for this purpose. So let's share that account with our pod:
podTemplate(cloud:'openshift', label: BUILD_TAG, serviceAccount: 'jenkins')
And now the final result we have a Jenkins build with two containers one running all NodeJS workload, the other push the build to a container:
def NODEJS_IMAGE = 'docker-registry.default.svc:5000/openshift/nodejs:10'
def NODEJS_CONTAINER_NAME = 'nodejs'

def OC_CLIENT_IMAGE = "registry.redhat.io/openshift3/jenkins-slave-base-rhel7:v3.11"
def JNLP_CONTAINER = 'jnlp'

podTemplate(cloud:'openshift', label: BUILD_TAG, serviceAccount: 'jenkins',

  volumes: [configMapVolume(configMapName: "hello-es", mountPath: "/my-config")],

  containers: [

      /*
        Container with Node 10
      */
      containerTemplate(name: NODEJS_CONTAINER_NAME, image: NODEJS_IMAGE, ttyEnabled: true, command: 'cat'),

       /*
         Container with the oc-client
       */
       containerTemplate(name: "jnlp", image: OC_CLIENT_IMAGE)

  ] ) {

    node(BUILD_TAG) {

        container(NODEJS_CONTAINER_NAME) {
            stage('Building Node 10') {
                git 'https://github.com/cesarvr/hello-world-nodejs.git'
                sh "npm install"
            }

            /* Nodejs packaging/testing */
        }

        container(JNLP_CONTAINER) {
            stage('Creating Image') {
                sh "oc new-build ${NODEJS_IMAGE} --name=frontend --binary=true || true"
                sh "oc start-build bc/frontend --from-file=. --follow"
            }

            /* Deploy the container ... */
        }

    }
}
The good thing about we can reuse the code inside
JNLP_CONTAINERfor other frameworks or languages.
I'm impressed by how easy it is to simplify builds with this plugin. Somebody asked me some days ago “How can he do a quarkus pipeline in Openshift?” I hope this post helps him solve that problem and helps you guys create really sophisticated, and more maintainable builds.